Power Apps dynamic forms offer the capability to create a single form structure that can be efficiently employed across various applications. The display of form inquiries and the nature of input they solicit are seamlessly managed through a collection of configurable parameters, obviating the need for any coding revisions during deployment. It is worth noting that dynamic forms are not inherently provided as a pre-built control type within Power Apps. This article elucidates the process of implementing Power Apps dynamic forms.
Create a New Canvas App:
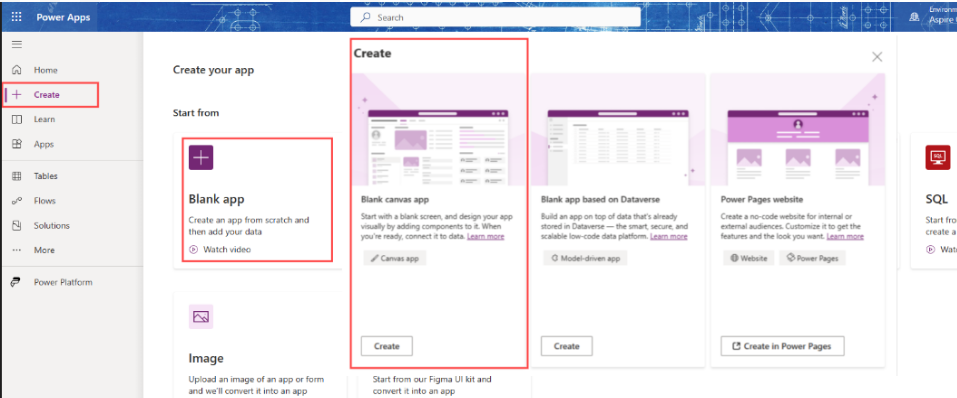
Go to the Power Apps portal and sign in.
Click on “Create” and select “Canvas app from blank.”
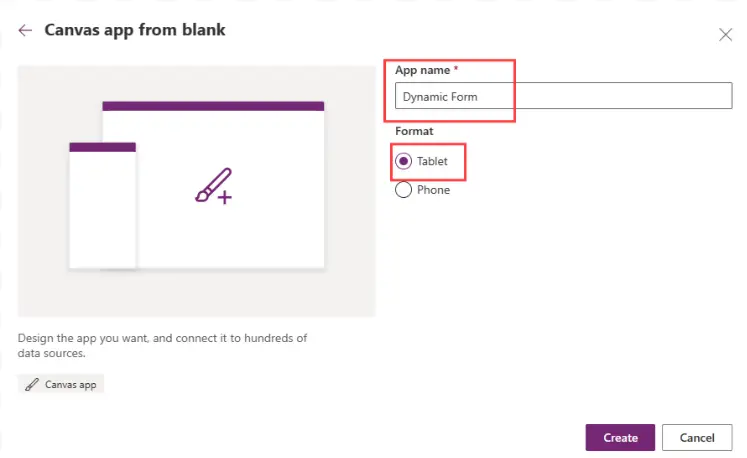
Develop an application titled ‘App Name’ and optimize it for tablet devices in the desired format.
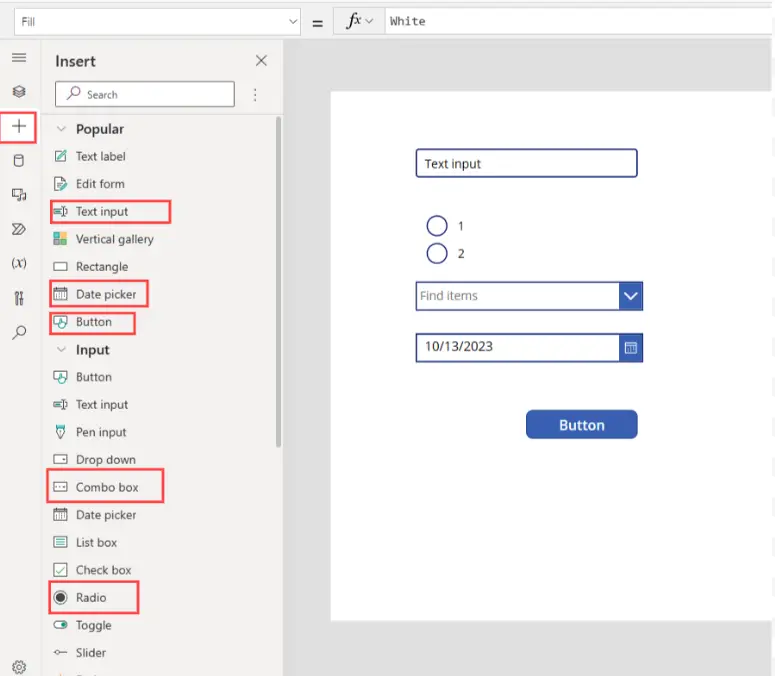
Incorporate a Blank Gallery Component Within the Canvas App
- Open Power Apps Studio and initiate the creation of a new application starting with a blank canvas. Proceed to incorporate the following user interface elements onto the designated screen:
- Text input
- Radio Buttons
- Combo box
- Date picker
- Button
Subsequently, incorporate a “Blank vertical gallery” onto the Screen.
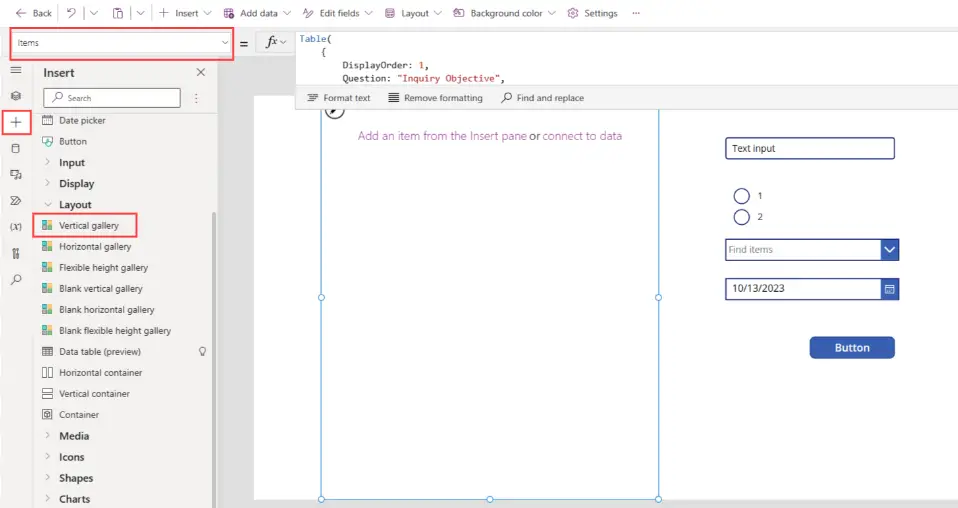
- Please insert the provided code into the ‘Items’ property of the gallery. This table comprises the questions to be presented within the dynamic form. The form will accommodate user input through various controls, depending on the specified response type.
					Table(
    {
        DisplayOrder: 1,
        Question: "Inquiry Objective",
        ResponseType: "Text"
    },
    {
        DisplayOrder: 2,
        Question: "Requested Funding",
        ResponseType: "Number"
    },
    {
        DisplayOrder: 3,
        Question: "Monetary Unit",
        ResponseType: "Radio",
        Choices: [
            "USD",
            "CAD"
        ]
    },
    {
        DisplayOrder: 4,
        Question: "Business Name",
        ResponseType: "Combobox",
        Choices: [
            "Apple",
            "Samsung",
            "Huawei",
            "Dell",
            "HP"
        ]
    },
    {
        DisplayOrder: 5,
        Question: "Requested Date",
        ResponseType: "Date"
    }
)
Present Interrogatives Within a Dynamic Framework
Each row within the gallery will display a question that requires user input. Integrate a new label control into the gallery for this purpose.
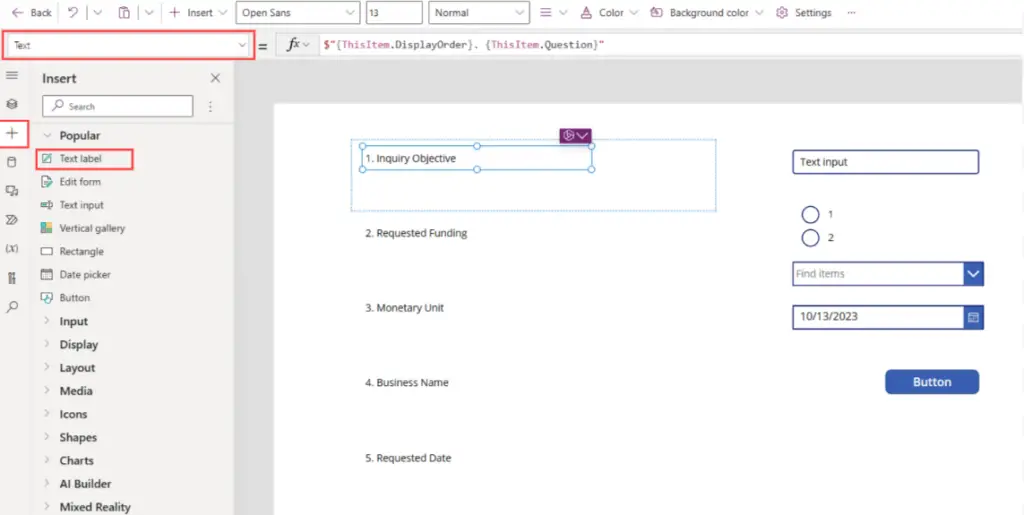
Subsequently, input the following code into the ‘Text’ property of the label to exhibit both the question number and the corresponding question.
$"{ThisItem.DisplayOrder}. {ThisItem.Question}"
Text Input Format Response
The initial question format necessitates a textual response, necessitating the inclusion of a text input field within the dynamic form to accommodate this requirement.

We aim to restrict the display of a text input field to specific questions within the form, excluding its presentation for others.
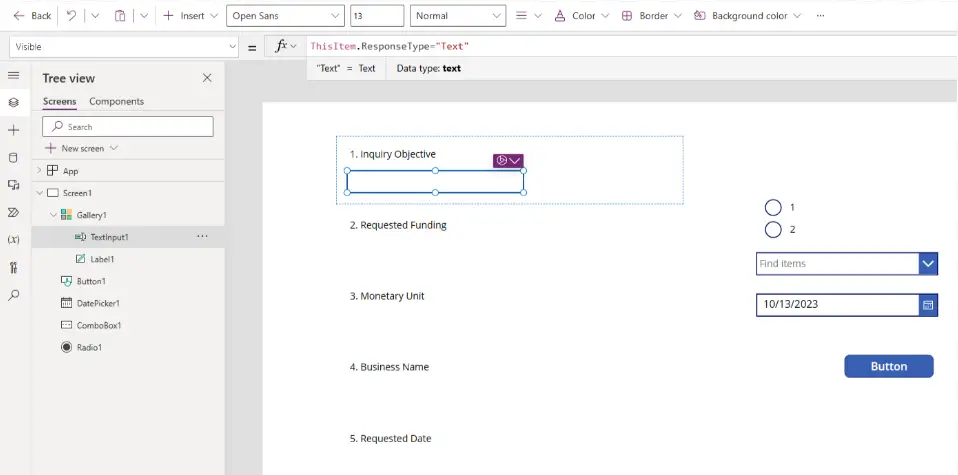
Please incorporate this code within the ‘Visible’ property of the text input.
ThisItem.ResponseType="Text"
Numerical Input Response Format
The second question format pertains to numerical responses. It is possible to adapt the text input field to accommodate numerical data capture as well.
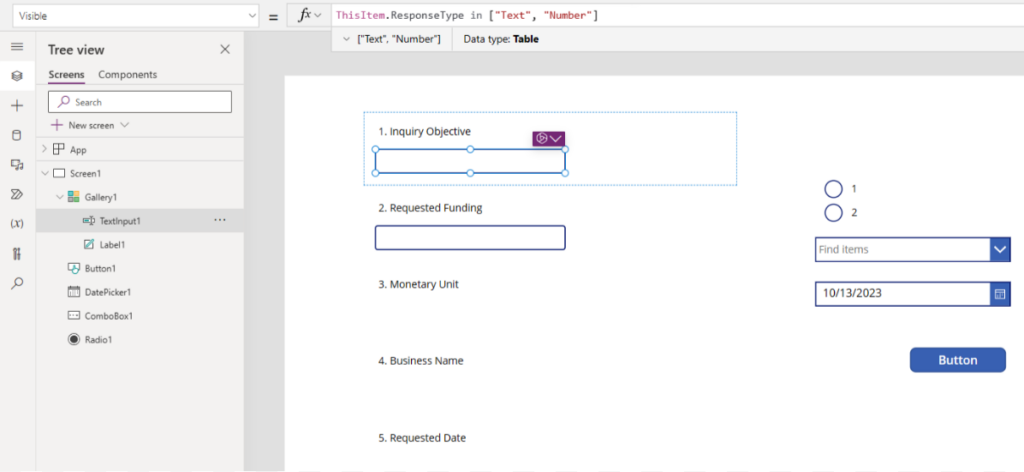
Please modify the ‘Visible’ property of the text input to ensure it is displayed for both text-based and numeric-type questions.
ThisItem.ResponseType in ["Text", "Number"]
Subsequently, incorporate this code within the ‘Format’ property of the text input element to exert control over its text input behavior, determining whether it permits all textual content or restricts input solely to numerical values.
If(ThisItem.ResponseType="Number", TextFormat.Number, TextFormat.Text)
Radio Input Response Format
The third query within the form necessitates the user’s selection from a concise array of response alternatives. It is our intention to display these choices using a radio button group.
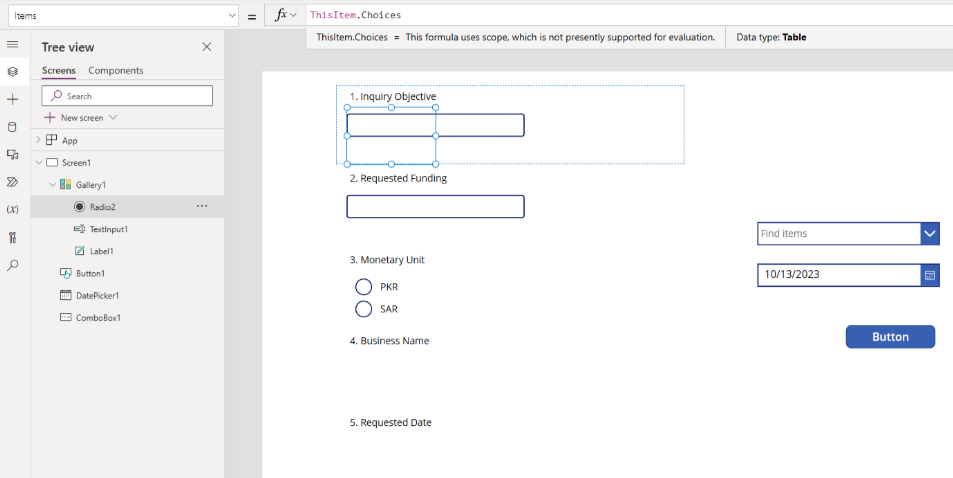
Please incorporate the following code into the ‘Items’ property of the radio buttons in order to exhibit the respective values.
ThisItem.Choices
Utilize the following code within the ‘Visible’ property of the radio buttons to restrict its display exclusively to instances where the radio response type is applicable.
ComboBox Response Format
The fourth query within the form necessitates the user’s selection from an extensive array of options. To facilitate this selection process, we will implement a combobox as the designated input method.
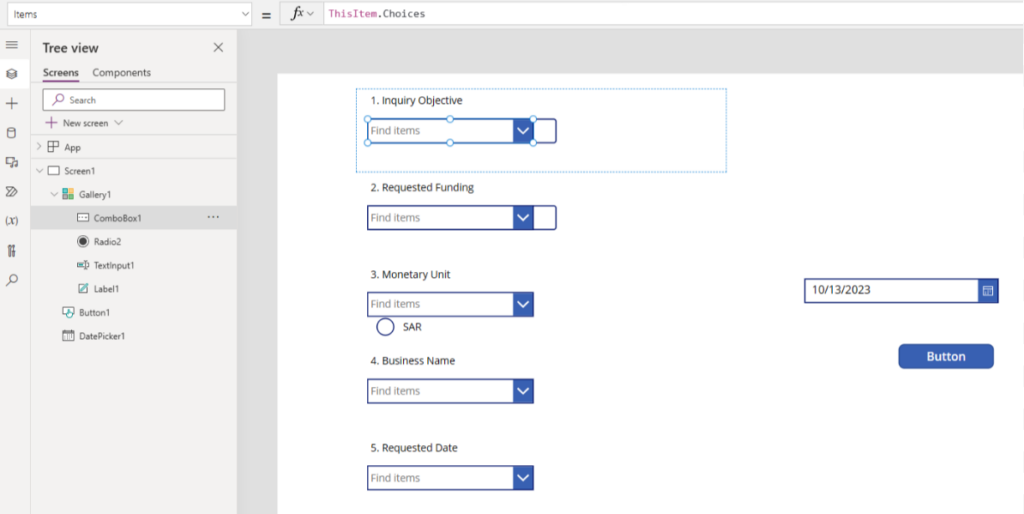
Please utilize the provided code within the ‘Items’ property of the combobox.
ThisItem.Choices
The enumerated options should be presented within the combobox in the following manner.
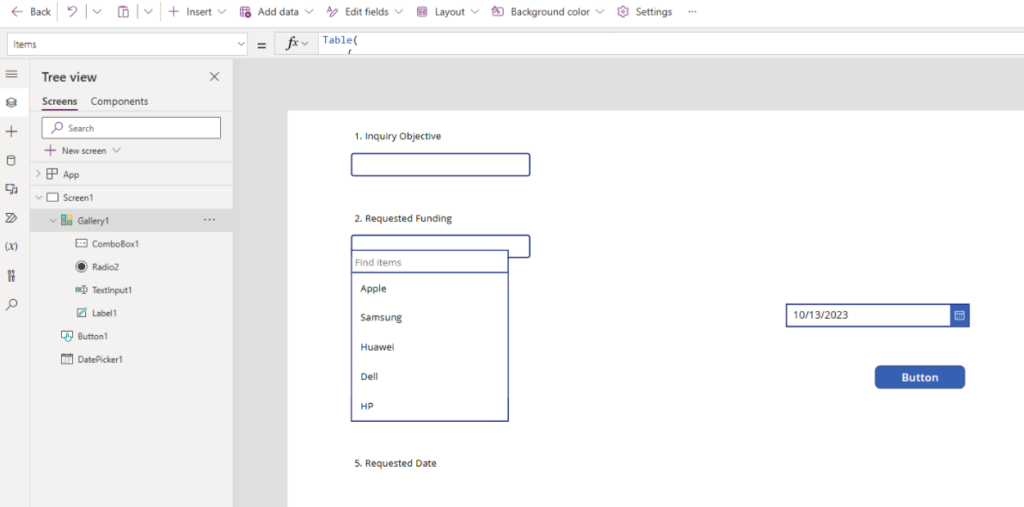
Apply this code to both the ‘DisplayFields’ and ‘SearchFields’ properties of the combobox.
["Value"]
Please implement the following code within the ‘Visible’ property of the combobox to ensure it is only displayed when the corresponding response type is applicable.
ThisItem.ResponseType="Combobox"
Date Picker Response Format
The fifth and concluding query within the form necessitates a date response format. To capture this information, we will employ a date picker and integrate it seamlessly into the dynamic form
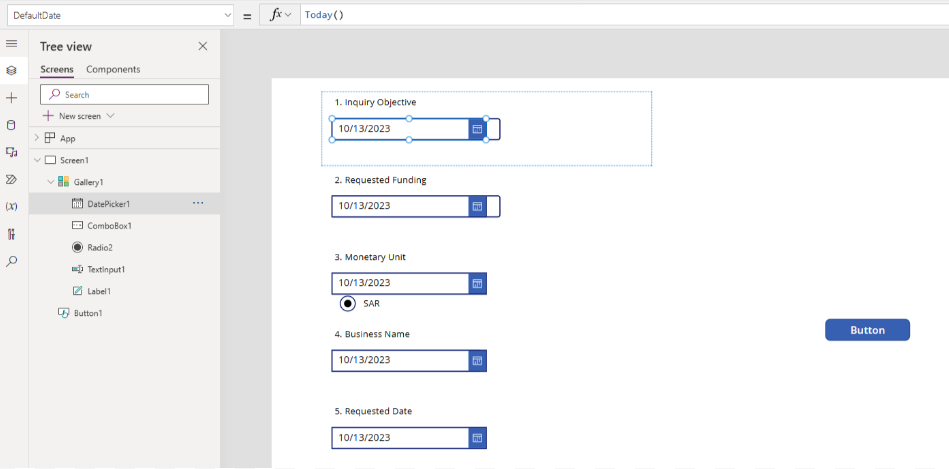
We seek to limit the visibility of the date picker exclusively to questions that pertain to date-related inquiries.
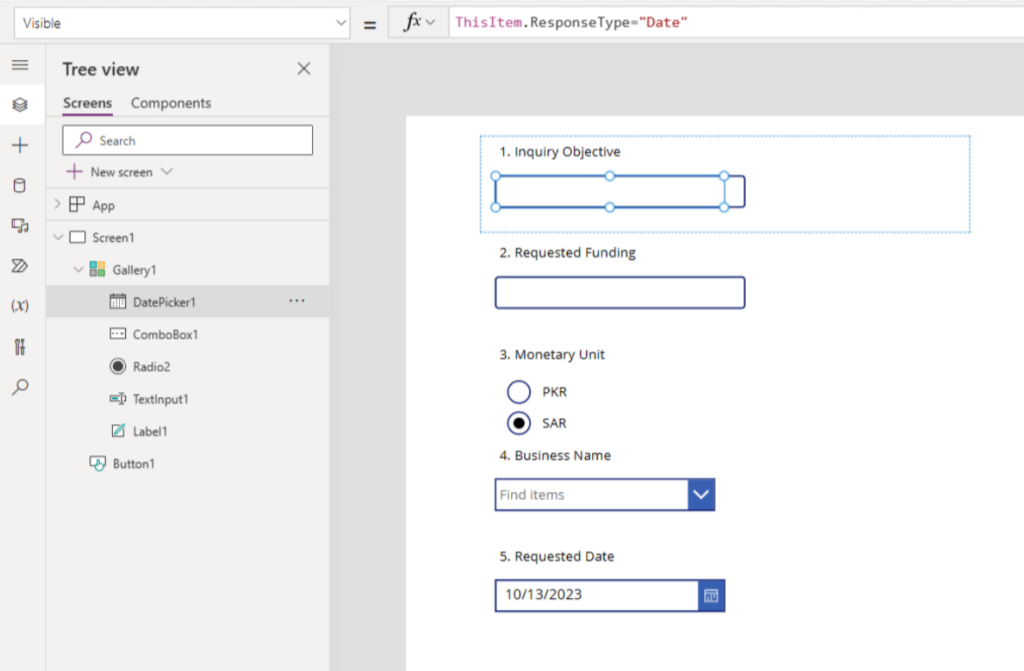
Incorporate the following code within the ‘Visible’ property of the date picker to restrict its display only when there is a necessity to input a date.
ThisItem.ResponseType="Date"
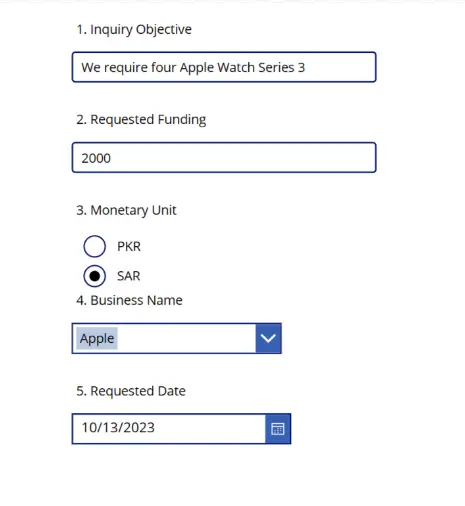
Previewing the Power Apps Dynamic Form
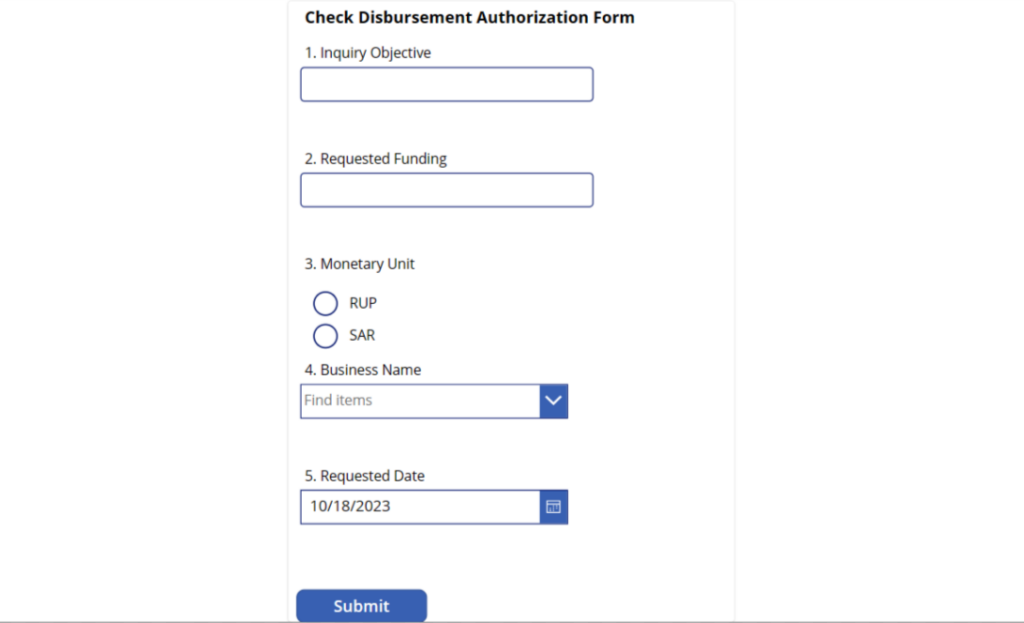
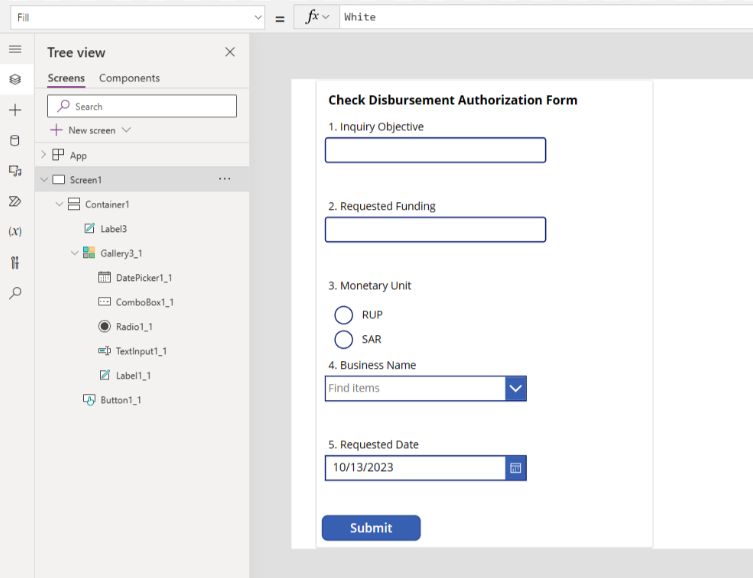
Prior to establishing a connection between the dynamic form and a data source, it is imperative to ensure that the form is correctly configured. To achieve this, you should initiate a preview of the dynamic form within the Power Apps studio, with the expectation that its appearance closely resembles the image provided below.
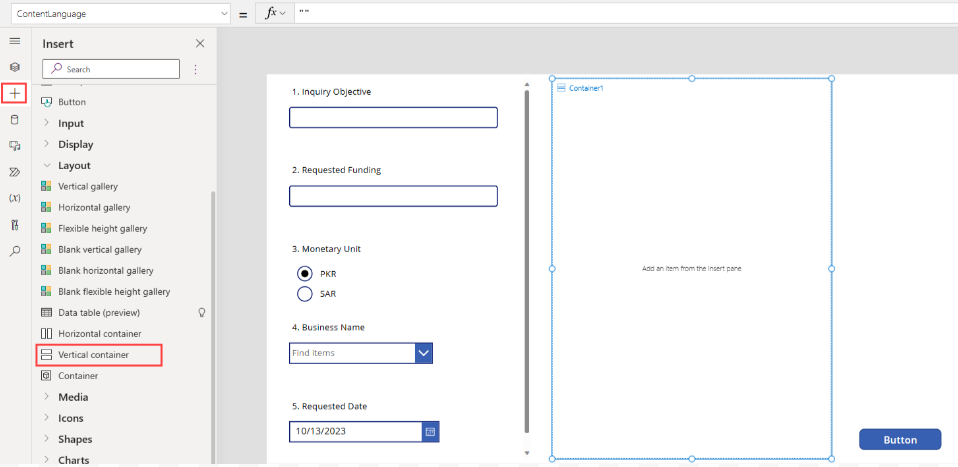
Transfer the dynamic form components to a vertical container
We seek to organize the form components, namely the title, the form itself, and the submission button, within a unified vertical container. Please introduce a new vertical container to the interface.
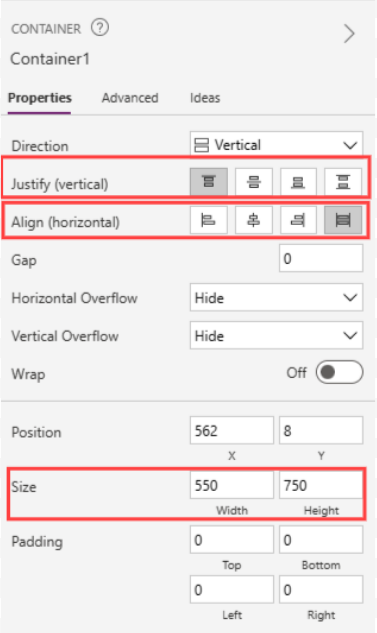
Please configure the vertical container as depicted in the provided illustration. Our objective is to ensure that the controls within the container span the entire width of the screen.
Please add a new label to the vertical container, including the following text “Check Disbursement Authorization Form”.
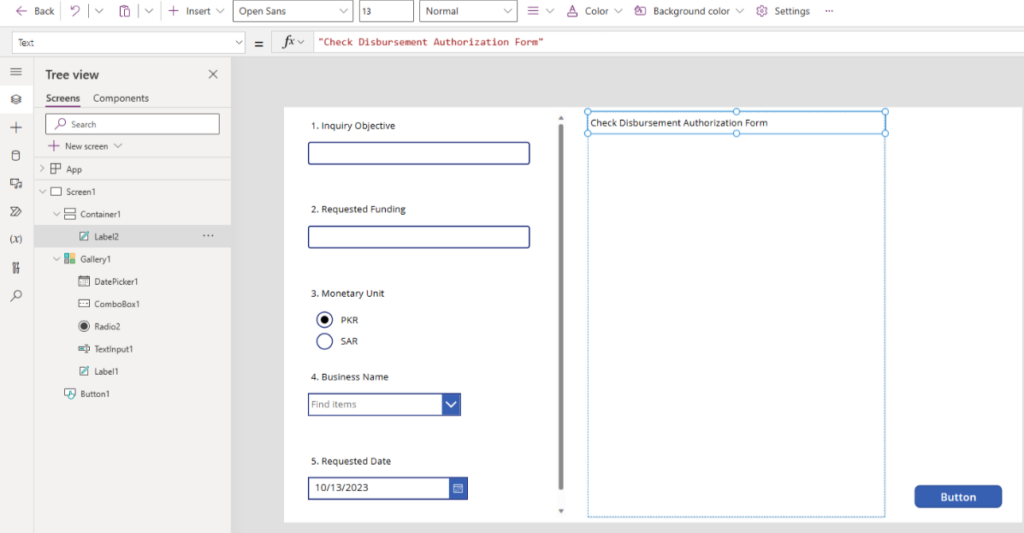
Please proceed by duplicating the dynamic form, also referred to as the gallery, and subsequently inserting it within the vertical container. Ensure that the flexible height property is deactivated once the gallery has been successfully placed within the container.
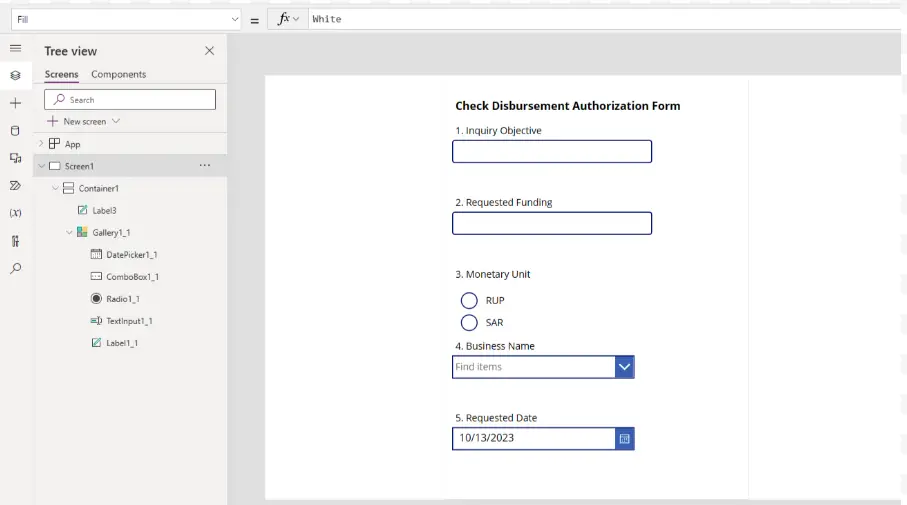
Finally, transfer the “Submit“ button by duplicating and inserting it into the vertical container to ensure its placement at the lowermost section of the dynamic form.
Create SharePoint List:
- Go to the Sharepoint portal and sign in.
- Navigate to the site collection of your choice, where you intend to establish the list.
- In the upper-right corner, kindly navigate to the ‘Gear’ icon and proceed to choose ‘Site Contents.’
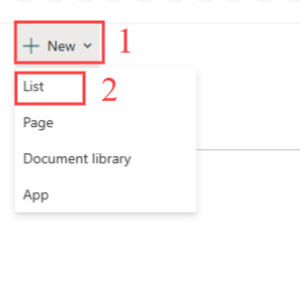
On the website’s content page, please navigate to the ‘New‘ option by clicking on the corresponding button, and subsequently choose the ‘List‘ option.
- Access the ‘Create a SharePoint list’ page.
- Navigate to the ‘Blank list’ option.
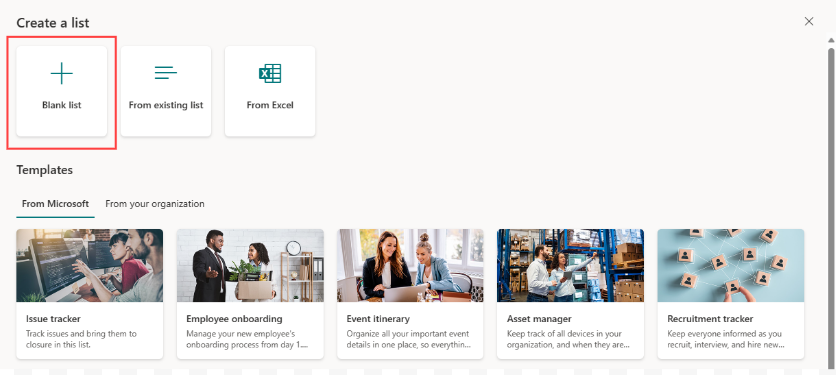
Assign a ‘Name’ to your list along with an optional description. Upon completion, select the ‘Create’ button.
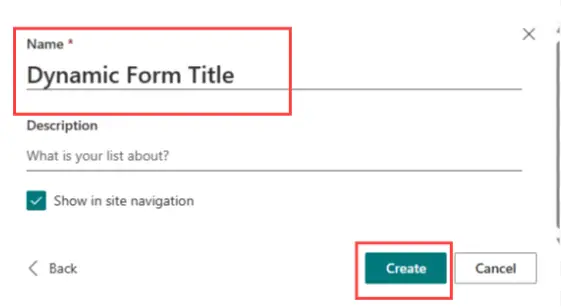
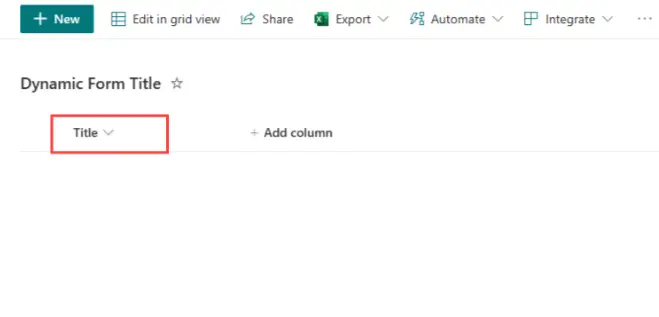
- Establish a novel SharePoint list denominated ‘Dynamic Form Title’ featuring the subsequent column specifications: Title (single line text).
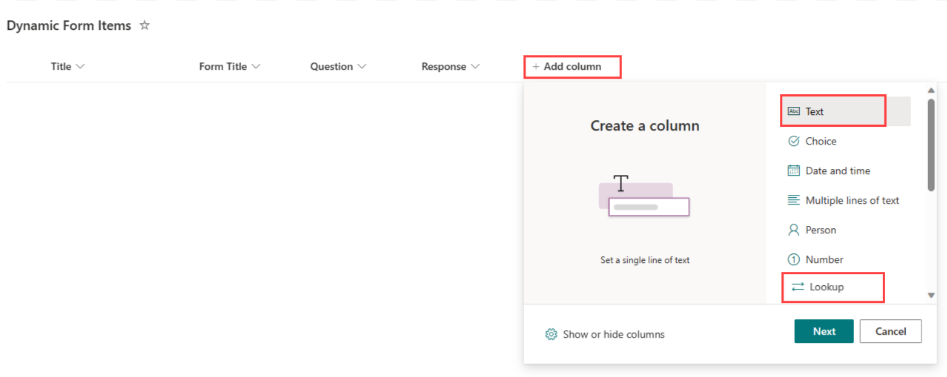
Subsequently, create an additional SharePoint list titled ‘Dynamic Form Items‘ and configure it to include the following columns.
Form Title (lookup)
Question (single line text)
Response (single line text)
Incorporate both SharePoint lists into the canvas app following their creation.
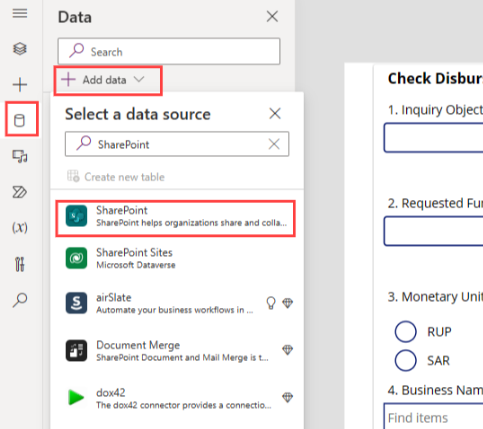
Navigate to the “Data” section located in the left-hand menu. Proceed to choose the “Add data” option, and subsequently, initiate a search for “SharePoint” within the provided search bar.
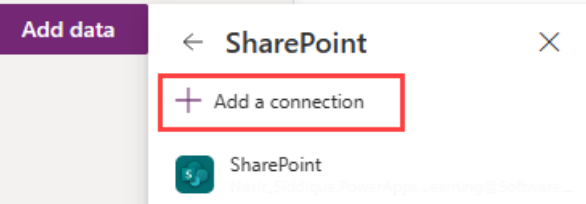
Please choose the option labeled ‘Add a connection.‘
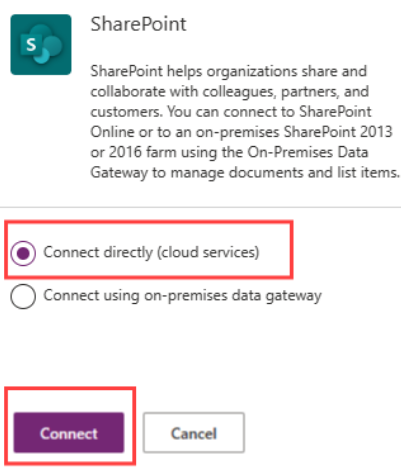
To establish a connection with SharePoint Online, kindly opt for the “Connect directly (cloud services)“ option and subsequently click on the “Connect“ button.
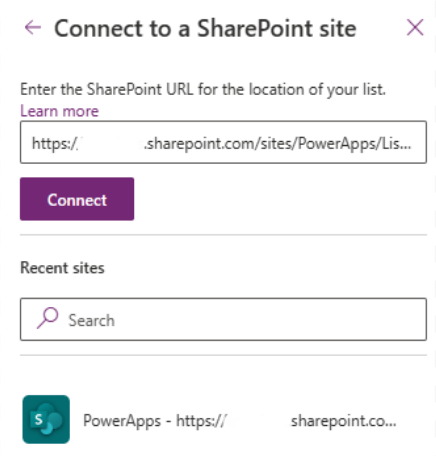
Establish a connection to a SharePoint site by accessing the “Recent sites” list, either by entering the site’s URL manually or pasting it, followed by clicking the “Connect” option.
In the ‘Choose a list’ section, please check the boxes corresponding to the lists you wish to utilize, and subsequently click on the ‘Connect’ option.
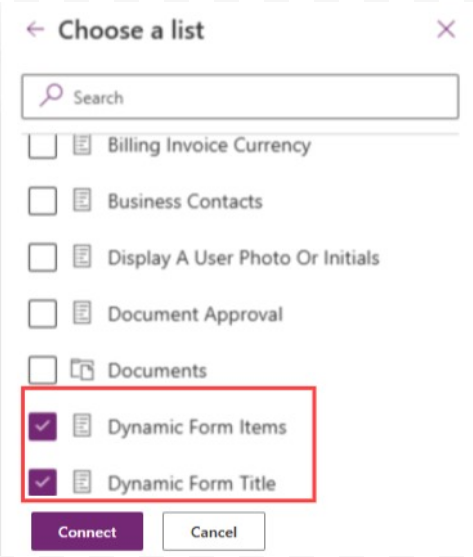
Incorporate both SharePoint lists into the canvas app upon their creation.

Kindly complete the submission of the Power Apps Dynamic Form
After the user completes the dynamic form, they initiate the data submission process by clicking the ‘Submit’ button, which records the data in SharePoint.
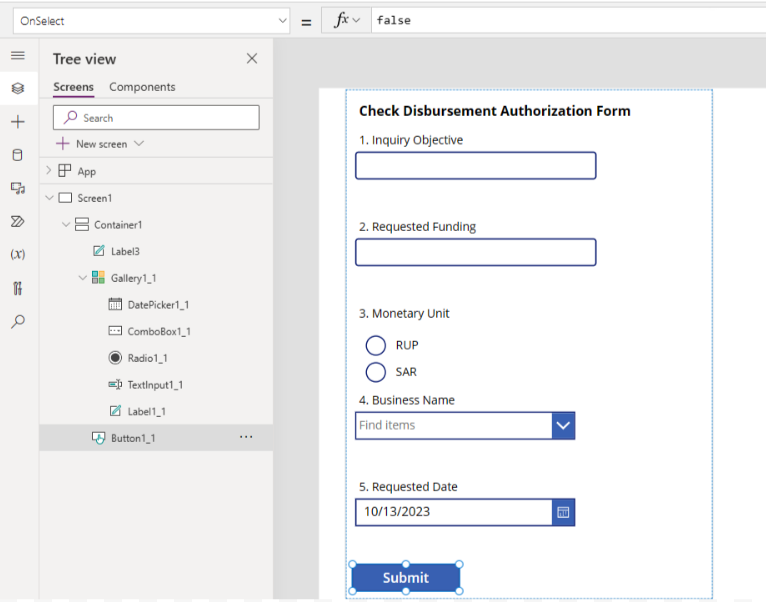
Utilize the provided code within the “OnSelect” property of the submit button. This code is responsible for the preservation of data input into the dynamic form within a collection. Additionally, it facilitates the establishment of a form header record and establishes associations between the form items and this header record.
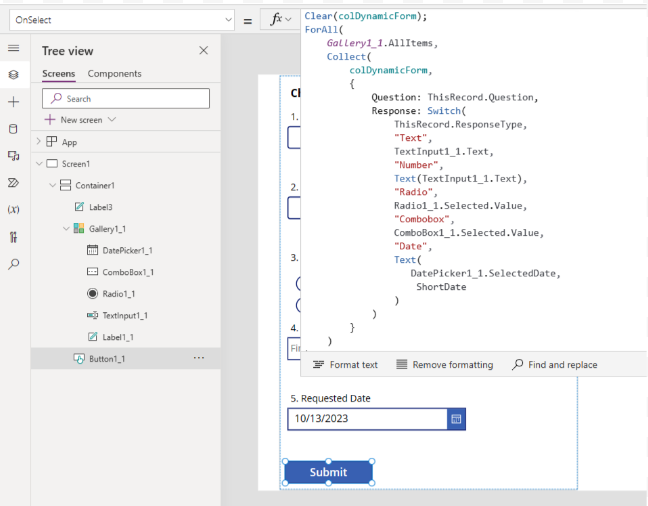
					Clear(colDynamicForm);
ForAll(
    Gallery1_1.AllItems,
    Collect(
        colDynamicForm,
        {
            Question: ThisRecord.Question,
            Response: Switch(
                ThisRecord.ResponseType,
                "Text",
                TextInput1_1.Text,
                "Number",
                Text(TextInput1_1.Text),
                "Radio",
                Radio1_1.Selected.Value,
                "Combobox",
                ComboBox1_1.Selected.Value,
                "Date",
                Text(
                   DatePicker1_1.SelectedDate,
                    DateTimeFormat.ShortDate
                )
            )
        }
    )
);
Set(
    varFormTitle,
    Patch(
        'Dynamic Form Title',
        Defaults('Dynamic Form Title'),
        {
            Title: Index(
                colDynamicForm,
                4
            ).Response
        }
    )
);
ForAll(
    colDynamicForm,
    Patch(
        'Dynamic Form Items',
        Defaults('Dynamic Form Items'),
        {
            FormTitle: {
                Id: varFormTitle.ID,
                Value: varFormTitle.Title
            },
            Question: ThisRecord.Question,
            Response: ThisRecord.Response
        }
    )
);
The Conclusive Appearance of this Application
